How to update Nmea2wifi firmware
Posted: Mon Sep 04, 2017 10:45 pm
Added on 9th of October 2019 - Starting with firmware version 6.2 there is a new way to update firmware without using cables. Please see here.
Hello,
At the moment of writing, the Nmea2Wifi multiplexer is supplied with firmware version 3.0. I am writing this post as I pretend to increase some of the functionalities of the module and I pretend to make them available to users. Even people that has duplicated the module hardware as per the published schematics can use this firmware. However I will not publish the source code. The firmware versions will be a single binary file such as the file NMEA2WIFIV30.bin which is the only one presently available. Future versions (if available) will be announced in this forum. Users of the module (if registered in the forum) will receive an email notification whenever a new firmware is available. It is also possible that customized versions of the firmware will be made available if requested by users and if considered (by me) as good enhancements to the module functionality.
In order to flash a new firmware you need to have the module totally disconnected. Before you disconnect the module from the power supply, do a "Factory Reset" as the new firmware assumes that the module is in that state when it is flashed. You need to have a PC running Windows 7.0 (or more) and follow the present instructions. Users with experience in the ESP8266 module can flash the firmware using different tools and operating systems. However, I will only consider (and support) flashing using the method described here. You do not need to be an expert to flash the module if you use the following instructions.
Hardware and preliminary tasks
You need to have a PC running Windows 7.0 or above and a USB data cable for Android devices such as the one depicted here
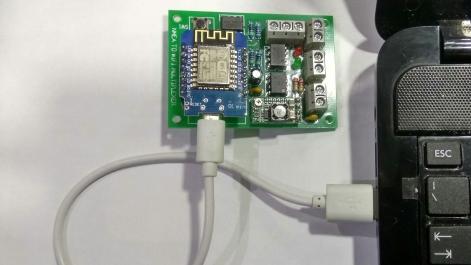
You need to have a USB port available on your PC to connect the module to the PC using the referred to USB cable. The first time you insert the USB cable in your computer (with the module on the other extreme of the cable) Windows will try to communicate with the CH340 integrated circuit that exists the Nmea2Wifi multiplexer and tries to install the drivers for that integrated circuit. If it fails (eg if you receive a warning saying that the hardware was not properly installed) you need to install those drivers by downloading this file: CH34x_Install_Windows_v3_4.zip. You unzip the file into a temporary folder and run the executable. You get this window
and you press INSTALL. When the drivers are successfully installed, you need to know the COM port associated with the module. To do this, you go to the Device Manager on the Control Panel and look at the COM ports that are available. In the following pictures I am using Windows 7 and the Portuguese language. It would very similar with other versions of Windows and languages. Firstly you disconnect the USB cable from the computer and look at the COM ports. In my case I get this
In your case it will be different, of course, but the important thing is to discover the COM port that is created when you reinsert the cable (with the multiplexer on the other end). In my case I get this
and so the COM port number to use when programming the Multiplexer is COM4! Take note of this COM port in your case.
Flashing the module
You need to download the flashing tool for the the multiplexer. You can get it by downloading the flashing package for the so called nodemcu system. Inside that package you find 32-bit and 64-bit executables. The full package is nodemcu-flasher-master.zip. The 32-bit executable is ESP8266Flasher_32.exe. The 64-bit executable is ESP8266Flasher_64.exe.
You need to have the firmware file. At the moment of writing only NMEA2WIFIV30.bin is available. You run the 32-bit or the 64-bit executable flasher, depending on your version of Windows. The interface is identical. You only need to set 2 parameters. The first is to enter the COM port to be used in the comunication with the multiplexer. In my case it is COM4.
Then you need to tell the flasher where the binary file to upload to the module is located. In my case the firmware file is located at C:\Users\Arduino\Desktop\NMEA2WIFIV30.bin. This location is introduced in the Config tab.
Then you return to the Operation tab and press FLASH. A blue bar starts to build (and the blue LED on the multiplexer blinks)
When it finishes, you are done!
Regards, Luis
Hello,
At the moment of writing, the Nmea2Wifi multiplexer is supplied with firmware version 3.0. I am writing this post as I pretend to increase some of the functionalities of the module and I pretend to make them available to users. Even people that has duplicated the module hardware as per the published schematics can use this firmware. However I will not publish the source code. The firmware versions will be a single binary file such as the file NMEA2WIFIV30.bin which is the only one presently available. Future versions (if available) will be announced in this forum. Users of the module (if registered in the forum) will receive an email notification whenever a new firmware is available. It is also possible that customized versions of the firmware will be made available if requested by users and if considered (by me) as good enhancements to the module functionality.
In order to flash a new firmware you need to have the module totally disconnected. Before you disconnect the module from the power supply, do a "Factory Reset" as the new firmware assumes that the module is in that state when it is flashed. You need to have a PC running Windows 7.0 (or more) and follow the present instructions. Users with experience in the ESP8266 module can flash the firmware using different tools and operating systems. However, I will only consider (and support) flashing using the method described here. You do not need to be an expert to flash the module if you use the following instructions.
Hardware and preliminary tasks
You need to have a PC running Windows 7.0 or above and a USB data cable for Android devices such as the one depicted here
You need to have a USB port available on your PC to connect the module to the PC using the referred to USB cable. The first time you insert the USB cable in your computer (with the module on the other extreme of the cable) Windows will try to communicate with the CH340 integrated circuit that exists the Nmea2Wifi multiplexer and tries to install the drivers for that integrated circuit. If it fails (eg if you receive a warning saying that the hardware was not properly installed) you need to install those drivers by downloading this file: CH34x_Install_Windows_v3_4.zip. You unzip the file into a temporary folder and run the executable. You get this window
and you press INSTALL. When the drivers are successfully installed, you need to know the COM port associated with the module. To do this, you go to the Device Manager on the Control Panel and look at the COM ports that are available. In the following pictures I am using Windows 7 and the Portuguese language. It would very similar with other versions of Windows and languages. Firstly you disconnect the USB cable from the computer and look at the COM ports. In my case I get this
In your case it will be different, of course, but the important thing is to discover the COM port that is created when you reinsert the cable (with the multiplexer on the other end). In my case I get this
and so the COM port number to use when programming the Multiplexer is COM4! Take note of this COM port in your case.
Flashing the module
You need to download the flashing tool for the the multiplexer. You can get it by downloading the flashing package for the so called nodemcu system. Inside that package you find 32-bit and 64-bit executables. The full package is nodemcu-flasher-master.zip. The 32-bit executable is ESP8266Flasher_32.exe. The 64-bit executable is ESP8266Flasher_64.exe.
You need to have the firmware file. At the moment of writing only NMEA2WIFIV30.bin is available. You run the 32-bit or the 64-bit executable flasher, depending on your version of Windows. The interface is identical. You only need to set 2 parameters. The first is to enter the COM port to be used in the comunication with the multiplexer. In my case it is COM4.
Then you need to tell the flasher where the binary file to upload to the module is located. In my case the firmware file is located at C:\Users\Arduino\Desktop\NMEA2WIFIV30.bin. This location is introduced in the Config tab.
Then you return to the Operation tab and press FLASH. A blue bar starts to build (and the blue LED on the multiplexer blinks)
When it finishes, you are done!
Regards, Luis